CSc 150
Lab 1 -- Something Old, Something New
Thurs, January 6, 2011
Objectives
- Get acquainted with the Eclipse development environment
- To use some familiar concepts with a (probably) new syntax: Java. These include
- comments
- displaying text on the screen (console)
- if statements
- boolean operators
- while loops
- arrays (called lists in some other languages)
- To practice with typed variables and Java primitives
Background
If you took your first programming course here at Union, you probably
learned a different language like Python, MATLAB, C#, or NXC. While
Java's syntax is sometimes different, many of the concepts you learned
work exactly the same, and the syntax difference is purely cosmetic.
So once you have one language under your belt, learning new ones is
easier since there will usually be familiar elements you can start
with. This is good news since learning new languages on your own is
something computer scientists and computer engineers do all the time.
Today you'll be getting cozy with Java by practicing with some
familiar concepts.
Preliminary Set-up
- Log into a lab computer. If you need help with login/password, let me
know.
- Connect to the antipasto server by selecting Connect To
Server from the Go menu in Finder. You will see a window like this:
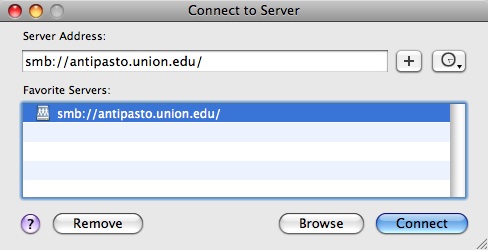
- Select smb://antipasto.union.edu from the list and click Connect. Then
select UnixFiles on the next dialog box you see. Note: the
UnixFiles folder is the same as your H: drive, if you ever connect to our
servers from one of the Windows PCs in Division 4 labs.
- Now you can create a directory for your work in this class. I
recommend creating a folder called CSC150 and then creating a folder called
workspace under that.
Getting Started with Eclipse
Launch Eclipse from the dock icon, if one is available, or you can find it
in the Applications/Eclipse folder. It will
ask you to select a workspace. Browse to the CSC150/workspace folder you
created under UnixFiles. You should use this workspace for all labs in this
course.
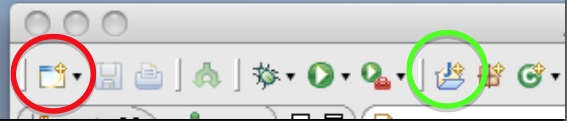
Now you're ready to start a new project. Do so by either:
- Selecting New > Java Project from the File menu.
- Select Java Project from the New Project icon (circled in
red on the left above).
- Click the New Java Project icon (circled in green on the right
above).
A dialogue box will then ask you for the project name. For
all labs, be sure to include your name and lab number (for example,
Cass Lab1). Press Finish, and you should now have a brand
new project listed on the lefthand pane of Eclipse. You're ready to start coding.
Add some Starter Code
In many labs, including this one, I'll be providing you with starter code
that you need to augment with your own code. Download Analyzer.java and Client.java into the src folder under the
lab folder that was created under your workspace folder. You
should then be able to open the little project folder in the lefthand pane
to find the files you just imported. Double-clicking on them will let you
see the code in the main Eclipse window (each with its own tab). If you
don't see them in the lefthand pane, try selecting the project folder there
at select Refresh from the File menu.
Classes and methods
When you write functions in Java, they are always contained in something larger
called a class. For now, you can think of a class as a collection
of related functions. So the two code files you downloaded are really two classes.
Look at Analyzer.java and you can see this from the first line:
public class Analyzer {
Java uses curly braces, {}, to tell when sections begin and end. So
the left brace after Anaylzer above shows where the class
begins, and the right one (all the way down at the bottom of
Analyzer.java) shows where it ends. All code is contained in
between. Within the Analyzer class, you'll see four functions:
numberCruncher, purchaseAnalyzer,
inDepthAnalyzer, and printer. When functions are
part of a class like this, they're called
methods, so that's the word we'll be using from now on. Ignore
the word public that seems to be preceding everything. We'll
tackle that later. Notice that three of the methods are empty.
Filling them in is going to be your job.
Take a look at the Client class now (i.e. the
Client.java file). It has a single method, main,
which most of you will be familiar with. In Java, when a program
executes, it is the main method that starts. For now, don't
worry about understanding all of the nuts and bolts in main
-- just the big picture. Though some of the details may be fuzzy, you
should be able to deduce that a bunch of variables are being declared
(near the for loop) and then the four methods in
Analyzer are being called in turn, along with some printouts to
the screen.
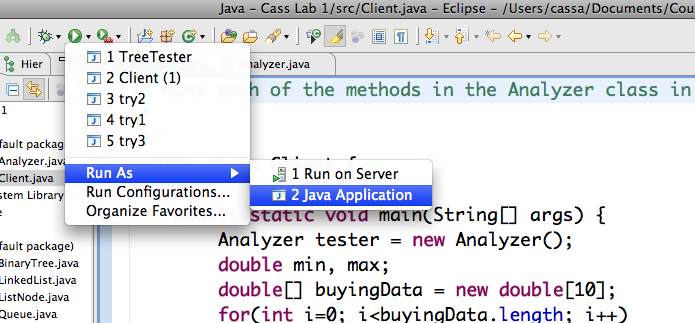
This code actually runs. From the Run menu, go to Run
As... and select Java Application.
PITFALL ALERT: Eclipse is wacky in that you must have the class with the
main method active (i.e. the
Client class must be showing) in order for you to run your code. Go figure.
For those who like toolbar shortcuts, you can also run your code from
the little green arrow shown in the picture below. Use the menu next
to the green arrow to pick Java Application, as shown below. When
you run it, three headings will print for PARTs 1,
2, and 3, along with the contents of an array. You can see the
results in the Console tab in the bottom pane of Eclipse. Congrats!
For many of you, you've just successfully run your first Java program.
Part 1: Number Crunching
Now that you've had some practice looking at and running Java code,
it's time to write your own. The numberCruncher method
should declare four local variables, initialize them, and then print
them to the screen.
Comment first
Before writing any code for a method, write a comment above
the method header giving an English explanation for the method's purpose.
In Java, comments are written in two ways:
//Use two forward slashes to start a single-line comment

/* or make a multiline comment
   using the forward slash-asterisk combination
*/
Always make a habit of commenting before coding. It'll
make your life much easier when the coding gets difficult.
Primitives and Printing
Once that's done, use Java primitives as shown in class. Be sure to
pick meaningful variable names that reflect the variable's
function. They are:
- a variable keeping track of the perimeter of a polygon. Values
will always be whole numbers, and you should initialize it to 14.
- a variable for the total balance in a savings account. This may
need to hold very large values so pick an appropriate type.
Initialize it to 3400 dollars and 59 cents.
- a variable for a subway line whose values are A, B, C, D, or E.
Initialize it to line E.
- a variable to show if someone is married or not: true if someone
is, false if not. Initialize it to false.
Then print the contents of each variable to the screen. You can do this with
System.out.print();
or
System.out.println();
where what you want to print goes in parentheses.
PITFALL ALERT: That's a capital 'S' in System.
Java is case-sensitive. And don't
forget the semicolon at the end! Most Java statements end in semicolons.
The first version leaves the cursor on the same line while the second
one prints and then moves the cursor to the next line. You can also
use the plus symbol (+) to concatenate text and variable
contents together. For example, if I had an integer age, I
could print it with:
System.out.println("You are " + age + " years of age today.");
If the age variable was currently 19, the above would print
You are 19 years of age today.
The printer method in the Analyzer class has other examples
you can look at. Print out the contents of the four variables
along with text to provide meaningful context. Test and debug until it works.
Part 2: Purchase Analyzing
For the purchaseAnalyzer method, you'll be analyzing purchases from
a simulated department store. The parameters are
- purchase: an array of purchases in chronological order, so
purchase[0] is the first purchase of the day
- min: as employees of this dept store, this is the minimum purchase
we like to see from our customers. Anything lower means we're not enticing
them enough!
- max: this figure represents a typical "large" purchase from a
customer. Anytime we have a sale above this means a salesperson did a great job!
What you'll need
This part of the lab is letting you practice with arrays and
IF statements: two concepts you should be well familar with, but the
syntax is a little different in Java. Concerning arrays, the main differences are:
- square brackets are used for the index, like myArray[15]
- the first element is in index zero, as in myArray[0]
- the length of the array is automatically kept in a variable
called length, so myArray.length is an integer
that is the length of myArray
Concerning IF statements, the most general if-then-else
statement has the following form (code in bold should be replaced by
the appropriate thing):
if (condition1)
{
   statements
}
else if (condition2)
{
   statements
}
...
else
{
   statements
}
The main things to note are:
- braces are again used to delimit sections
- the else if and else clauses are optional
- logical operators && (for "and"), || (for "or") and ! (for "not") can
be used in the condition clauses
See this
IF tutorial and this
page on logical operators for other examples.
Your job
This method should analyze the first three purchases of the morning
(and you may assume we've had at least that many). If all three were
above (but not equal to) the max threshold, you
should print that we've had a
"Great Morning!" followed by what the three purchases were. However,
if any of the purchases were at or below the min
threshold, you should simply print that we've had a "Bad Morning".
Test and debug until it works. Remember that the starter code already
prints out the array of purchases at the end, so you can see
if your code is working or not. Test it several times: the array is
refilled with random purchases each time it runs. Don't forget to
comment first!
Part 3: In-Depth Analyzing
For the final method, inDepthAnalyzer, you'll practice
with while loops, whose basic form includes curly braces
for the loop body:
while (condition under which to keep going)
{
   statements to repeat
}
You are required to use while loops for the following.
Job #1
Write code that finds and prints the first good purchase of the day
(the first one over max). If none exist, say so.
If one does exist, print the amount of the purchase and the place in
the array (the index) where it was found. Only the first
good purchase should be printed.
Job #2
Find the number of good (over max) purchases made before the first
bad one (at or under min).
Remember to comment first!
How to turn in this lab
Before turning in any program in this class,
remember our mantra: just because it works doesn't mean it's good. Part
of your grade will also come from things like understandability and
coherency. You will also be graded on the neatness, presentation,
and style of your program code.
It's important to use white space, readable indentation, and also to make
sure the overall design and logic of the program are coherent.
Comments should be completely readable when printed.
For all labs, turn in only an electronic version. Please zip up your
program and email it to me at cassa@union.edu.
Follow these instructions to create the zip file:
- Whenever you create a new project in Eclipse, a new folder is
created in the workspace. Find this folder in your workspace folder.
- Compress this folder into a zip file by right-clicking on it and
selecting Compress. Ask for help if you're having problems!