Navigation
Dial-a-Style
Publishing
Once you have finished creating your web page on your own local machine, you're ready to place your page on the Internet. This is called publishing your web page, and it's really just a matter of transferring all of your web files (html files, css files, pictures, etc.) to another computer called a web server. The web server allows anyone on the Internet access to the web pages it contains. As students of CSc 055, you have been given an account on a web server named antipasto. This tutorial shows you how to get your web pages transferred to the antipasto server from your home computer using an application called FTP (File Transfer Protocol). If you're using a Mac in one of our labs, you can just follow the directions from class instead of using this tutorial. Keep reading for instructions for PC users. Or click here for instructions for Macs.
PC Instructions
Step 1: Login to antipasto
PCs have an application called SSH Secure File Transfer Client. It's available for download as Secure Shell from the ITS software list. Download and install it if you don't have it already. Once you start it running, it should look like the picture below.
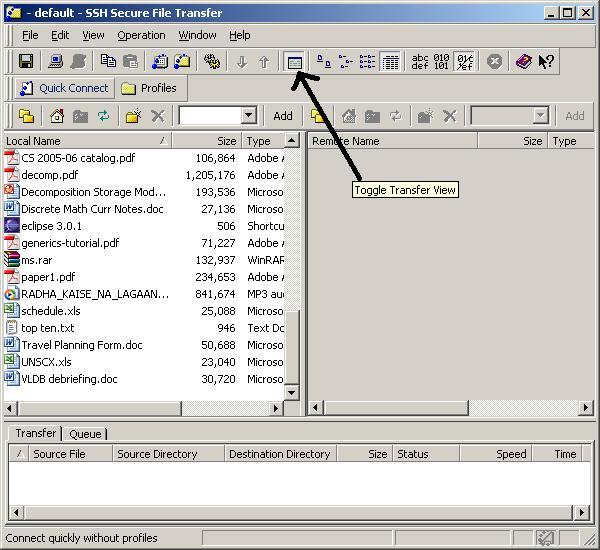
If your view does not look like the picture, try pressing the "Toggle Transfer View" button as indicated in the picture.
Press the "Quick Connect" button near the upper-left of the application to log into antipasto. In the diaglogue box that appears, type antipasto.union.edu for the Host Name and your account name for the User Name. Your account name is your email username (usually 7 letters of your last name + first initial). Don't worry about the Port Number or Authentication Method.
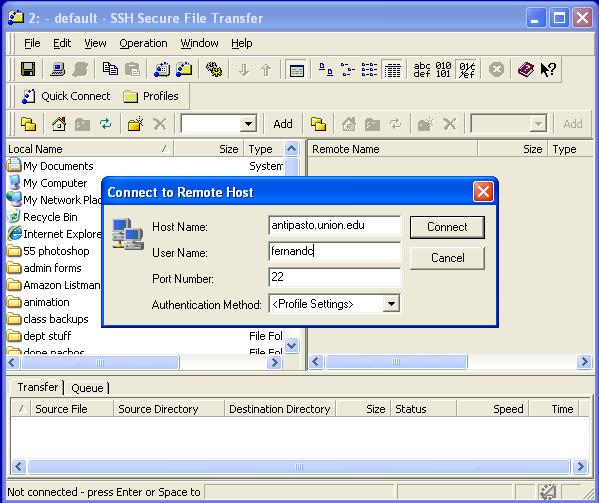
Then press the Connect button. You will be asked for your password.
Step 2: Transferring files
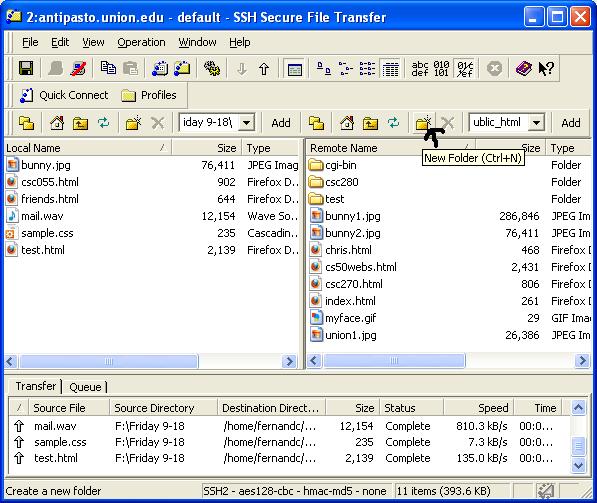
Once logged into antipasto, the SSH File Transfer screen will look something like this:

The list of files on the left are those on your local machine. The ones on the right are the files in your antipasto account. One of the folders on antipasto on the right-hand side is called public_html. You must transfer your web files into this folder so double-click on it now to get into it.
You'll be publishing every assignment in this class, so you need to keep things organized by putting files into separate folders on antipasto. To make a new folder on antipasto, click the "New Folder" button on the right-hand side as shown below. You could also do it by right-clicking in the right-hand pane and select New... Folder from the menu that pops up.
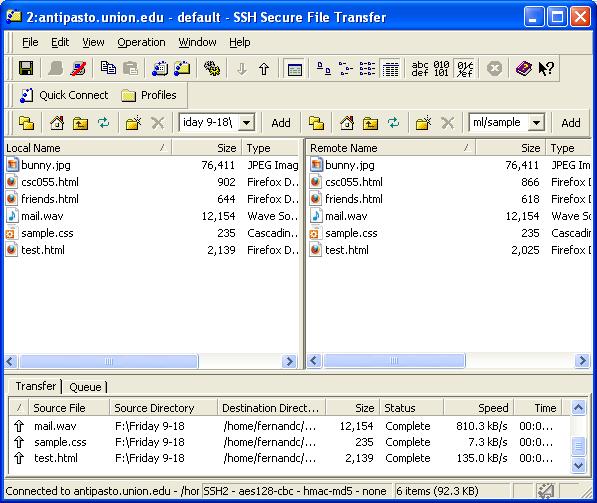
For this demo, I've made a new folder named "sample" and I've double-clicked on it to move into it on the right-hand pane. Once you're in the correct folder on the right-hand side, find your web page files on the left-hand side (or just find them in a different window). Transfer all of your html, css, sound, and picture files onto antipasto by clicking and dragging them to the right side of the window, as shown in the picture below.
Once all of your files have appeared on the right-hand pane, you're done! All that's left is to view and test your page on the Internet. Click here for how.
Mac Instructions
Macs have an application called Mac SFTP. It's available for download from the ITS software list. If you're not able to open the file after downloading it (i.e. if it opens in TextEdit), then you may not have StuffIt Expander on your Mac. Get StuffIt Expander, install that, and then you should be able to open and install Mac SFTP. Launch it and you should see a login screen like the one pictured below.
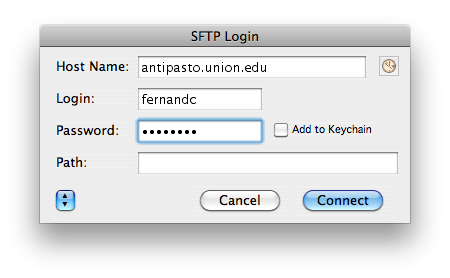
Step 1: Login to antipasto
Type antipasto.union.edu for the Host Name and your email username where it says Login. Your email username is usually the 7 letters of your last name + first initial. Then type your password. You can leave the Path field blank.
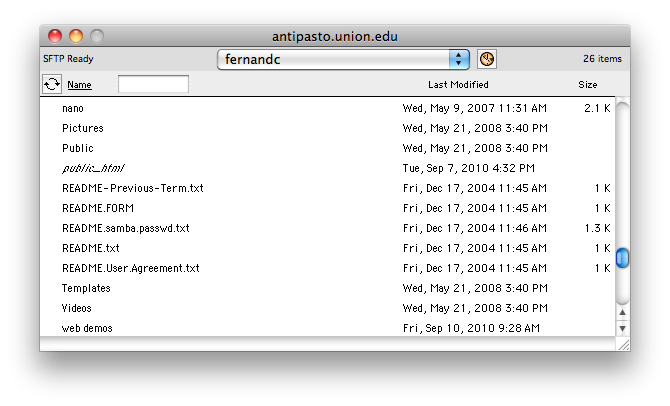
Once you connect, you'll see a list of files in your antipasto account (see picture below). One of these is a folder named public_html. All web files must be put into this folder so double-click on it now to get into it.
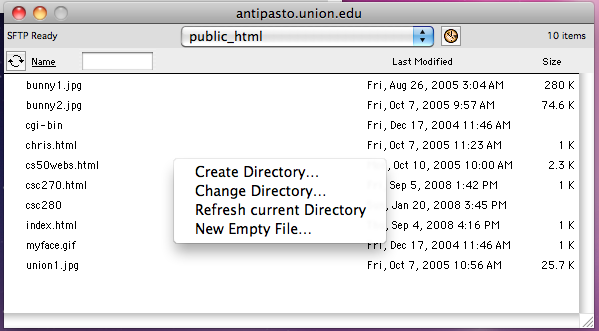
You'll be publishing every assignment in this class, so you need to keep things organized by putting files into separate folders on antipasto. Once you're in your public_html folder, make a new folder by right-clicking and selecting "Create Directory" from the menu that pops up (see picture below).
Step 2: Transferring files
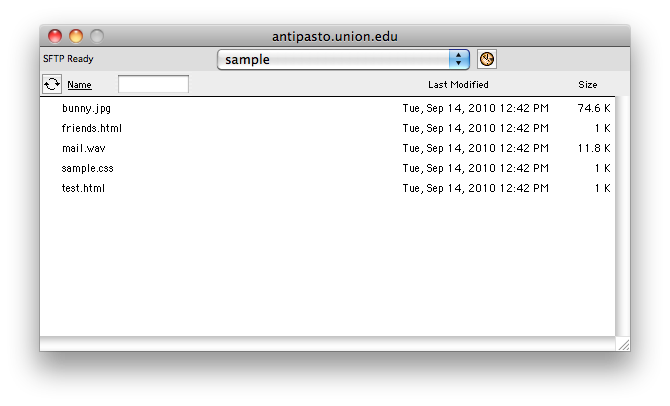
For this demo, I've made a new folder named "sample" and I've double-clicked on it to move into it (see picture below). Then, all you need to do is click and drag all of your html, css, sound, and picture files into this window. Once they all appear, you're done! All that's left is to view and test your page on the Internet.
Step 3: Check it out!
Once your files have all been transferred to antipasto, your page is considered published. Anyone on the Internet should be able to see it. What's the URL? Well, it partly depends on what folders you put the files in. For this demo, mine would be:
http://antipasto.union.edu/~fernandc/sample/test.html
My account name is fernandc so you should replace this with your
own account name. Don't forget the mandatory tilde (~) right before it.
The rest of the URL is the path to the html file you want to display,
including the name(s) of any folders you placed into public_html.
So in this example, I made a new folder named "sample", and I placed my html files
(including "test.html") into it. So that's why "sample" is part of the URL. In general,
your URL will be:
http://antipasto.union.edu/~YOUR ACCT NAME/PATH TO HTML FILE
PITFALL ALERT: Note that "public_html" is never part of the URL.
So for your first homework, I'm having you place your files inside a folder named "hw1" which is inside another folder named "hw", which is inside a "csc055" folder. So the URL of your first assignment will be:
http://antipasto.union.edu/~YOUR ACCT NAME/csc055/hw/hw1/index.html
If you have individual questions, don't hesitate to contact me for help.