Navigation
Dial-a-Style
Assignment 2
Due Fri, Sept 30
Objectives
- to set up the directory structure for the rest of your CSc055 assignments
- to create a web site which benefits from the use of Cascading Style Sheets
- to extend your knowledge of CSS
- to experiment with image processing
- to practice creating hyperlinks to pages within a web site and to pages in external sites
- to explore building sites with Aptana
- to explore image maps
Details
From now on, you should use Aptana to create web pages for this course. Don't use TextEdit or a plain text editor anymore.
Part 1: Create a Standard Folder Structure
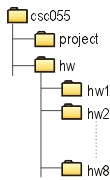
Your first task is to create the directory structure shown in the picture above in your account on the antipasto web server (i.e. in the webfiles portion of your antipasto account). Real web sites end up having a lot more files than you would expect (html, css, and image files to name a few) so it's important to keep files organized when publishing.
The csc055, hw, and hw1 folders should already exist from the last assignment. You just need to make the others. As each assignment is completed, it should be published to its own subfolder (e.g. this assignment will be published inside the hw2 folder). The project folder (which is NOT in the hw folder) will eventually contain your project web site. Since I use automated software to find your files and grade your assignments, it is important that you create your directory/folder structure exactly as shown - including the same capitalization and spacing. Don't lose points needlessly!
PITFALL ALERT: I strongly recommend that you keep a similar organization scheme on your own local computer that you actually do your assignments on. If you don't, it will be very easy to make hard-to-detect mistakes, like editing one file but looking at a different one with your browser. That's not as likely to happen if each assignment is in its own subfolder.
Part 2: Web Site using Cascading Style Sheets, Images, and Links
Find a picture that would make a good image map with at least four linkable "hot spots". Create a web site with the structure shown below. Each rectangle represents a web page and each line represents two links: one in each direction.
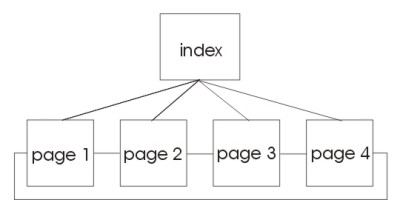
The index page will be the opening page for the site. At minimum, it should contain the image map, a heading, and instructions to the user.
The other four pages should each contain (at minimum) a small part of the original picture (the "hot spot"), some text about the picture, and the following links:
- a link to an external web site of some relevance
- a link to the index page
- links to the "previous" and "next" pages. For example, Page 2 in the diagram above should contain links to Page 1 (the previous page) and Page 3 (the next page). Page 4's next page should be Page 1. Page 1's previous page should be Page 4. In this way, a user should be able to "cycle" amongst all of the non-index pages in forwards or backwards order.
Use an image processing program like Gimp to resize the original picture and the cropped hot spots as needed.
The appearance of the web site is up to you, except for the following requirements:
- All pages should include a comment for the Assignment number
- All pages should include three <meta> tags for author, keywords and descriptions.
- Use a common style for the web site that is controlled using a single external style sheet. Each page must use the external style sheet.
- The 3 internal links (previous, next, and index) on pages 1-4 should each be a picture, like so:
Accomplish this by either finding appropriate images on the web or else making your own images. Do not use an image map for this. Just make each picture a link.
Publish your web site so that its URL is "antipasto.union.edu/~username/csc055/hw/hw2" where username is your user name on antipasto. This means that the index page must be named "index.html". Test the published site on both IE and Firefox.
What to Turn In
Please turn in printouts of all HTML and CSS code. Don't forget that each HTML file needs the right DTD! And, as always, go through the gradesheet so you don't miss things.
Gentle reminder...
All assignments are individual projects. I encourage you to talk to others about the general nature of the project and ideas about how to pursue it. However, the technical work, the writing, and the inspiration behind these must be substantially your own. If any person besides you contributes in any way to the project, you must credit their work on your assignment. Similarly, if you include information that you have gleaned from other published sources, you must cite them as references. Looking at, and/or copying, other people's written work is inappropriate, and will be considered cheating.