Programming Project 3 - due Friday, February 19, at the end of the day
Working in teams
The same rules apply as for the first programming projects. You can work on this project in teams of at most two people. If you do decide to work on this project with somebody else, please let me know by Thursday in class that you are working together. Then submit a joint solution. Note: that you cannot work with the same partner on more than two programming projects. That is, if you worked with the same partner on the first two programming projects, you will have to find somebody else to work with for this project.
If you work with a partner, please use pair-programming techniques similar to what we do in the lab. That way you ensure that both partners are contributing and that both partners understand your solution and why and how it works. Do not split up work.
You should not collaborate with anybody outside of your team. Plagiarism of code is equally bad as plagiarism of other written material. And as with other written material, you have to credit any source that you use. You are welcome to discuss the problems with other people and to talk about general solution strategies. However, to be safe, you should never look at somebody else's code or let anybody else see your code. And you should never write down any code in those discussions. If you get completely stuck, please come to see me and I will point you in the right direction.
The goal
For this project, you will implement Conway's Game of Life. We talked about it in class. To review the rules for how a new generation is based on the last generation see the Wikipedia page about Conway's game of life.
Step 0: Code to start from
Download the following two files and save them in the same place/folder:
As for the grid exercises that we did in class, the file gol_display.py contains the code necessary for visualizing the game of life grid. Note how the file gol_getting_started.py imports the function run_game from gol_display.py. The function run_game is very similar to the function run_display from the grids exercise, but it has one more parameter. The value for this additional parameter should be the name of the function that calculates what the next generation of the grid will look like. In gol_getting_started.py this function is called next_gen. At the moment, this function doesn't do anything useful. It will be your job to provide the code.
To run the program in gol_getting_started.py you need to call the function play_gol. When you run it right now, you just see a green circle on a blue background. The green circle is the start/stop button. When you press it, the function run_game starts calling the function that calculates the next generation every few hundred miliseconds; when you press it again, it stops calling the next generation function. Right now, this is not really useful because we don't even have a grid, yet. So, that's your first step.
Step 1: Create a grid of dead cells
Complete the function create_grid, such that it creates a new grid of the desired size indicated by the parameters. All cells in that grid should be dead. That is, the grid should be represented as a list of lists, and the inner lists should be filled with 0's.
(Hint: this is very similar to what you did for the grid exercise that you worked on in class. Study the solution to the grid exercise, if you are having problems.)
You should now be able to run your program and you should see a grid of purple squares.
Step 2: Make the grid clickable
When the user clicks on a cell that cell should change its status: dead cell should become alive and life cells should die.
(Again, very similar to what you did for the grid exercise.)
You should now be able to run your program and you should see a grid of purple squares and when you click on a cell, it should turn orange and when you click on it again, it should turn purple again.
Step 3: Count the life neighbors of a cell
To be able to calculate the next generation, we need to count how many life neighbors each cell has. So, one important subtask is to count how many life neighbors a given cell has. We will use the function life_neighbors to carry out this task.
Complete the function life_neighbors to count how many life neighbors the specified cell has. The function takes three parameters: the grid and the row and column identifying the cell we are interested in. The function should return one number, which is the number of life neighbors of the cell identified by the row and column number.
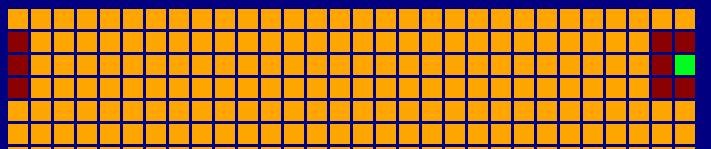
Watch out for the edges of the grid! If the given cell is at the edge, it should take the cells at the opposite edge to be adjacent. For example in the following picture, all of the dark red cells are considered to be adjacent to the green cell.
How can you test this function? Eventually, it will be called by the function next_gen for every cell of the grid. But we don't have that function, yet. Therefore, to test life_neighbors, you have to write some special code just for testing it. Specifically, here is what you can do. Comment out the two lines of code that are already in next_gen and instead copy the following code into next_gen:
    n1 = life_neighbors(grid,0,0)
    n2 = life_neighbors(grid,0,1)
    n3 = life_neighbors(grid,1,1)
    print "The cell at row 0 and col 0 has ",n1," life neigbors."
    print "The cell at row 0 and col 1 has ",n2," life neigbors."
    print "The cell at row 1 and col 1 has ",n3," life neigbors."
    print
    return grid
Then you can run your program, click on some cells to make them alive, and then click on the green button to start "evolving". We are not actually evolving anything, yet, and your visualization should not change, so you can quicly click on the green button again to stop it. But in the Python shell window you should see a print out which tells you how many life neighbors three specific cells have. Try different configurations of life cells and make sure that your function counts them correctly.
Step 4: Compute the next generation
Now you are ready to apply the function life_neighbors to every cell in the grid. Set the corresponding cell in the new grid should be set to be alive or dead according to the rules:
- Any live cell with fewer than two live neighbours dies, as if by loneliness.
- Any live cell with more than three live neighbours dies, as if by overcrowding.
- Any live cell with two or three live neighbours lives, unchanged, to the next generation.
- Any dead cell with exactly three live neighbours comes to life.
- Any other dead cell, stays dead.
Have fun trying out some different starting configurations. See the Wikipedia page for inspiration.
Step 5: Submit on Blackboard
Submit your .py files on Blackboard. There is a link in the "Assignments" section.