CSC-107: Creative Computing
Creative Computing uses a media computation theme to learn about computers and computing. You will learn to program a computer using the Python programming language, to manipulate images, video and text.
The first part of the courses focuses on digital images as a way to introduce variables, decision making statements and loops. You'll learn how to change individual pixels in an image, to change their color, or even their orientation. The effects you'll see include making a picture greyscale, mirroring, making pictures negative and blending pictures together. All of these effects are achievable with software such as photoshop, but in this course we will use these effects to learn the fundamentals of how we program computers to solve tasks - not solely tasks related to images, but any task that requires computation.
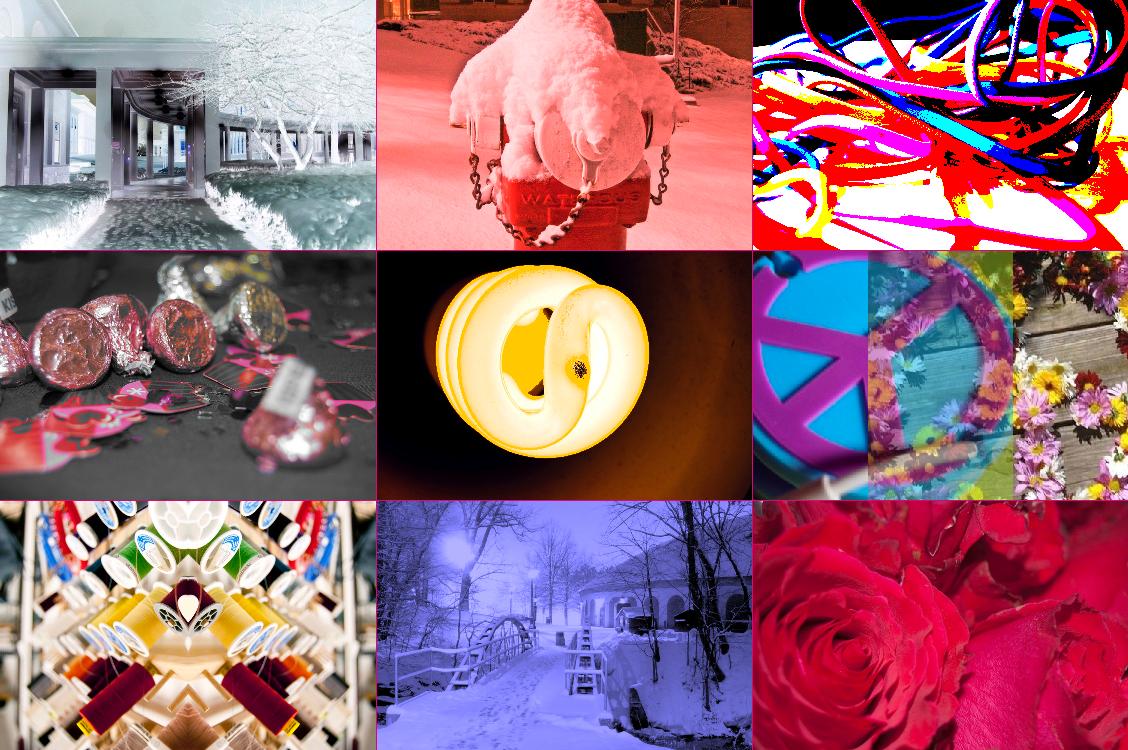
During the course, there are two large media projects. The first is to create a digital image collage, by using your programming skills to manipulate images. The picture at the top of this page is one example, and you can see more in the gallery of collage images from previous classes.
The second half of the course focuses on digital sounds, to reinforce the skills learned in the first half, and to demonstrate that these skills are transferable - that you are learning the fundamentals of programming, which apply to different media, as opposed to learning specific image manipulation skills.
In this course you will learn to program Python. In order to make digital media manipulation easier, we use a program called JES, which allows you to use Python on images and sounds. You can download these resources for your own computer if you wish.
In class, you are required to use our lab iMacs. However, when working on your projects outside of class, you have a choice. If you'd like to continue using our iMacs, feel free! We have three spaces that you can use:
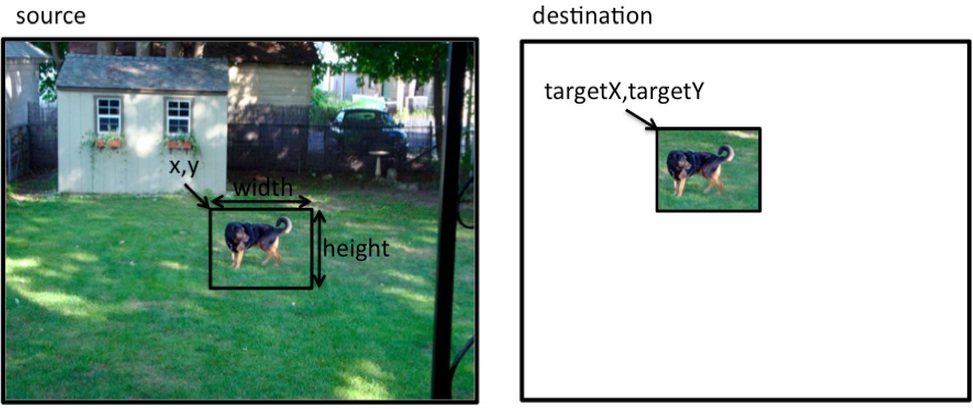
1. Create the function: copyPicture(source,target,targetx,targety), which takes a source picture, a target picture, and a target x and y coordinate, copies the source picture starting at the x and y coordinates in the target canvas. The function should return your target picture.
Upload an image created using this function to Nexus.
2. Cropping a picture. Create a copy function that takes 8 parameters: a source picture, a destination picture, an x and y location, a width and height, and a targetX and targetY location. The function will copy an area the size of the width and height parameters from the source image starting at the x,y location to the targetX, targetY location in the destination picture. Your function should return a picture.
Create an image using your function and post it on your webpage, and upload it to Nexus.
Deliverables:
1. Submit your python file through nexus and a hardcopy of the code in class.
2. Upload your image files to nexus.
3. For the last part, also post the image to your webpage.
Part I - Posterizing
Recall the posterize function from class. This function reduced the colors in an image to two colors, black or white, and chose the end color for each pixel based on the luminance (greyscale value) of that pixel. The goal of posterizing is to reduce the number of colors in an image by mapping lots of possible colors to a single color.
For this lab, you will write a python program that takes an image and reduces the number of colors to 8 colors. We get down to 8 colors by assigning either 0 or 255 for each of the Red, Green and Blue parts of a single pixel (2^3 possible combinations gives 8 total colors). So your program will reduce an image to the following 8 colors. In each color the R, G and B values are either 0 or 255. So your program will reduce an image to the following 8 colors. In each color the R, G and B values are either 0 or 255:
|
|
|
|
|
|
|
|
There will be weekly homework exercises. Homework exercises are for you to play with and reinforce the concepts we talk about in class. Each person must hand in his or her own solution. Where these exercises require python programs, you MUST hand in working code, including test measures. This will be explained more fully at the appropriate time.
There will be two programming projects. These projects will combine different programming concepts and multimedia techniques, and provide opportunities for creativity. Each student must complete his or her own programming project. You may discuss algorithms with each other, but you may NOT look at each other's code. To complete these projects on time, it is critical that you start each as early as possible and get help as soon as possible when needed.
There will be labs where you will work on exercises in-class and receive help from the lab assistant, your peers and instructor.
There will be one in-class midterm exam, and a final exam that must be completed individually. There may be "pop quizzes" and independent in-class exercises. The intent is to motivate you to keep up and provide feedback on your progress. Learning to program is like learning a foreign language: if you do not speak it during some part of every day your progress will be quite slow.